Course Outline — Lesson 16 of 22 ▼
L6.2 — Stop-Loss Placement: Structure-Based Stops vs Arbitrary Stops
Stop-Loss Placement: Structure-Based Stops vs Arbitrary Stops
A stop loss is not a safety net. It is a hypothesis test.
When you place a trade, you have a thesis: price will move in a certain direction because of a specific structural or fundamental reason. Your stop loss is placed at the level where that thesis is wrong — where the market has demonstrated that your read was incorrect. If price reaches your stop, you were wrong. You accept the loss and move on.
This framing matters because it clarifies where the stop must go: at the structural level that invalidates the trade — not at a number calculated from a pip distance, not at a round number that feels comfortable, and not at a point chosen to minimise the loss.
Structure-Based Stop Placement
A structure-based stop is placed behind a structural swing point that, if breached, proves the trade thesis invalid.
For a long (buy) trade:
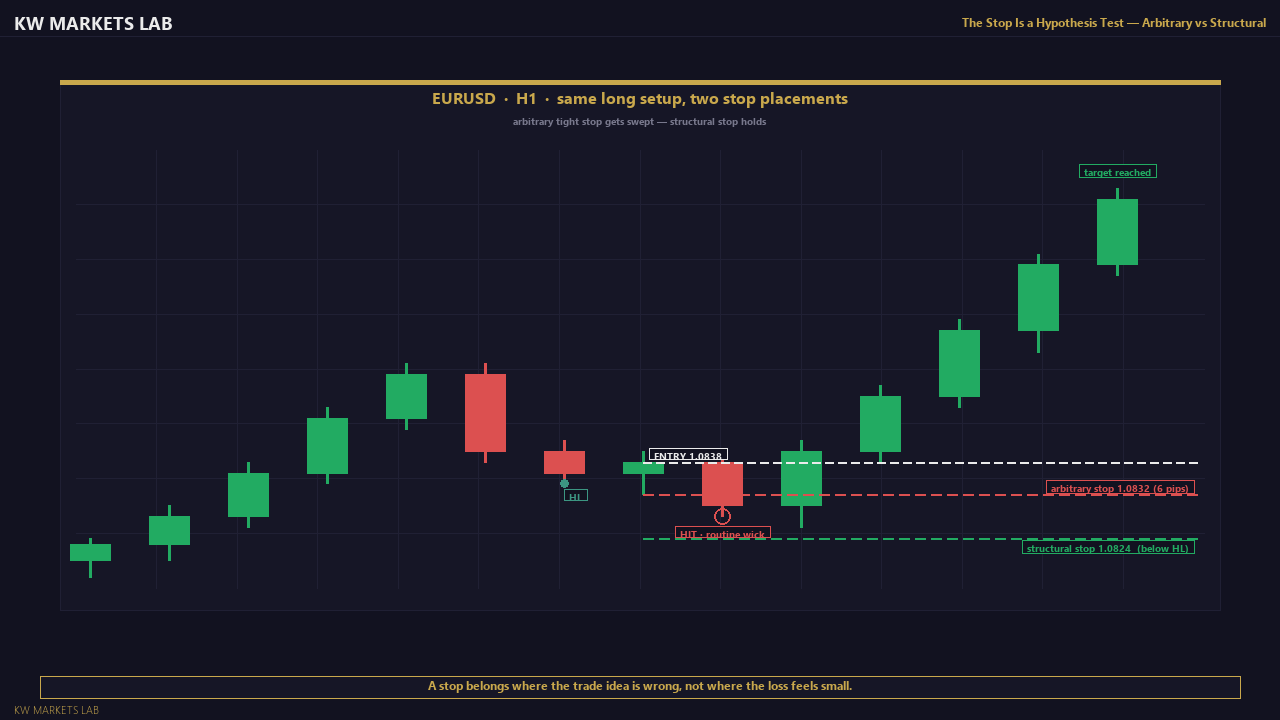
Place the stop below the most recent significant swing low that the trade is being built upon. If you are buying a pullback to a support zone in an uptrend, the stop goes below the lowest point of that support zone — specifically below the swing low that marks the lower boundary.
The logic: if price is in an uptrend and you are buying a pullback to a higher low, the trade is valid as long as that higher low holds. If price closes below the swing low, the HH/HL sequence is broken (CHOCH from L2.3). The trade thesis — buying the pullback in an uptrend — is no longer structurally supported. The stop takes you out at the point of structural invalidation.

For a short (sell) trade:
Place the stop above the most recent significant swing high. If you are selling into a resistance zone in a downtrend, the stop goes above the highest point of that resistance zone. If price closes above that level, the LH/LL sequence is broken and the bearish bias is invalidated.
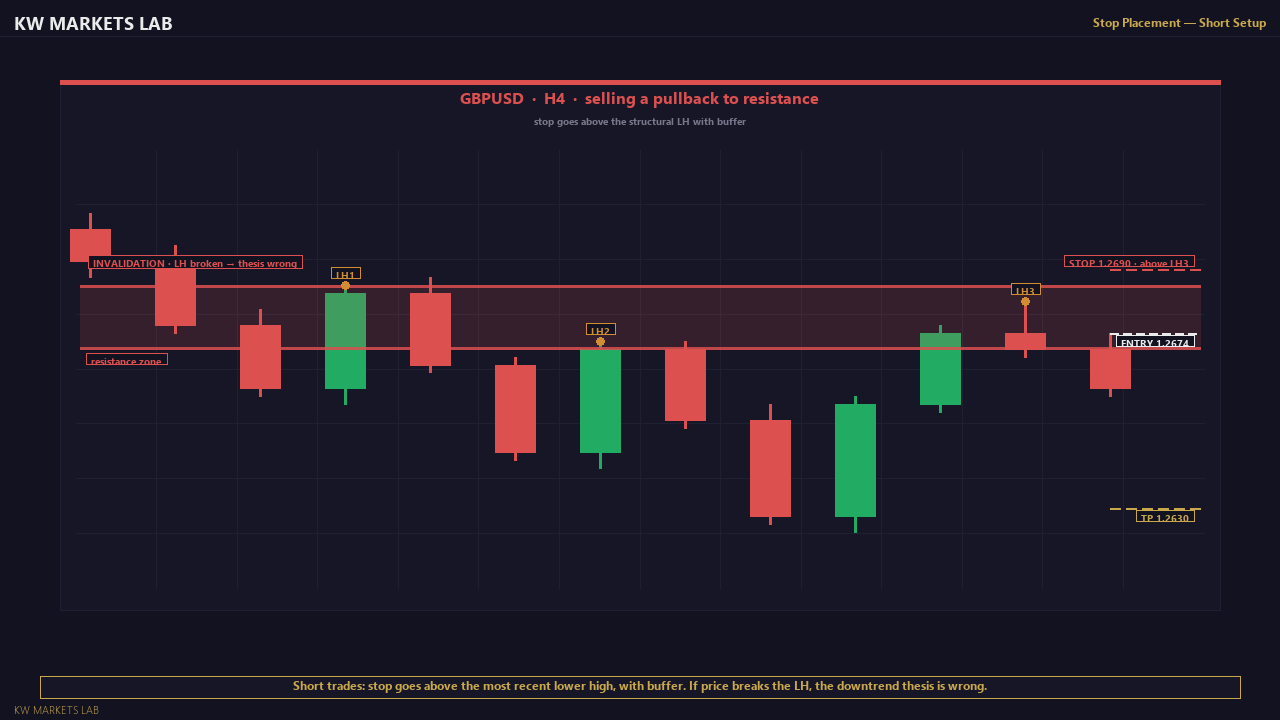
The stop is not placed at the swing point itself — it is placed beyond it, with buffer.
A stop at exactly the swing low level leaves it vulnerable to a wick that briefly pierces the level and returns (a liquidity sweep). Standard buffer: 5–20 pips on forex pairs, $3–$10 on XAUUSD, depending on the instrument's typical wick extension at that level on the timeframe you are trading.

Where NOT to Place a Stop Loss
At an arbitrary pip distance from entry.
"I always use a 30-pip stop" or "I put my stop 20 pips away" is arbitrary. The stop has no relationship to the market's structure. Price has no reason to respect your chosen pip distance. This produces:
- Stops too tight: frequently hit by normal market noise before the trade direction plays out
- Stops too wide: risk per trade is inconsistent and position sizing becomes meaningless
At round numbers that everyone else is using.
If your stop is at 1.0800 on EURUSD and a major psychological level is at 1.0800, your stop is in the exact cluster that institutional order flow may sweep through. Placing your stop beyond the psychological level (e.g., 1.0787) gives it structural protection beyond the sweep zone.
Exactly at the swing point without buffer.
A stop at the precise wick low of a swing point assumes that any breach of that level, however brief, invalidates the trade. In practice, wicks briefly exceed prior swing points regularly without constituting a structural break. Give the level room.
Moving the stop wider after entry because the trade is going against you.
This is the most dangerous stop-loss error. It is not stop-loss management — it is hope management. The stop was placed where the thesis is wrong. Moving it wider when price approaches means you are accepting a larger loss to give the trade "more room" — and removing the discipline that makes your risk management meaningful. This habit is responsible for a significant proportion of catastrophic losses in retail trading.
Stop Distance and Its Relationship to Position Size
This is the critical mechanical link between stop placement and risk management:
The further your stop, the smaller your position size must be (to keep dollar risk constant).
If you risk $100 on a trade and your stop is 20 pips away, your position size is calculated to lose $100 at 20 pips. If the correct structural stop requires 50 pips of distance, you must reduce your position size so the dollar loss at 50 pips is still $100.
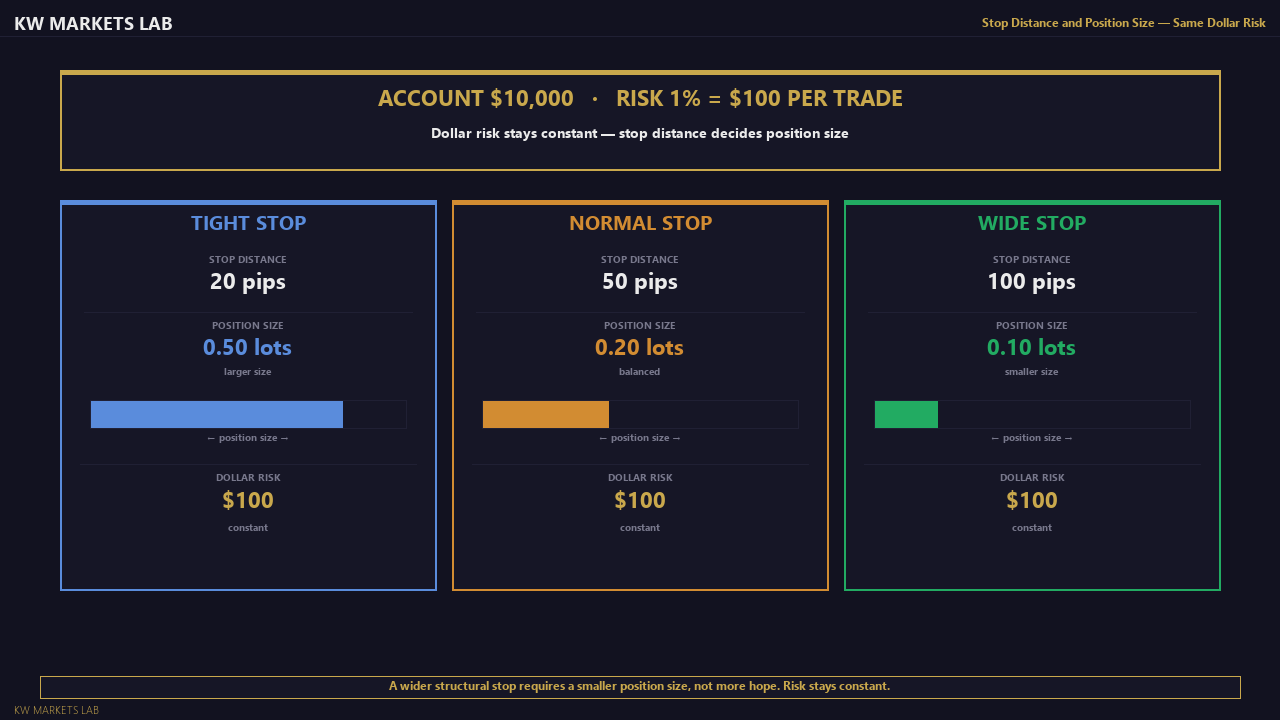
Many traders intuitively resist this. "If I use a 50-pip stop, I have to trade a smaller lot — that's less profit if I'm right." Correct. But it also means the stop is at the right structural level rather than at a level that gets hit regularly by market noise. A stop that gets hit less often, at a larger distance, on a smaller position is more profitable over time than a tight stop that gets hit repeatedly before the trade eventually goes your way.
Wide structural stop + smaller position size = correct risk management.
Tight arbitrary stop + larger position size = false economy with high stop-hit frequency.
The position sizing formula that links these variables is covered in full in L6.3.
Using ATR as a Volatility Reference
ATR (Average True Range) is an indicator that measures the average pip/point range of a candle over a defined lookback period. It is not used as a trade signal here — it is used as a reference for how wide stops need to be to avoid being hit by normal price noise.
If the daily ATR on EURUSD is 70 pips, a 10-pip stop on the daily chart will be hit by normal volatility on almost every trade. A stop that is at least 0.5–1× ATR away from the entry gives the trade room to breathe while still being at or near a structural level.
On gold (XAUUSD), the daily ATR is often $25–$60. A $10 stop on a daily gold trade is almost certain to be hit by noise. Stops on gold need to reflect gold's actual volatility range, not a pip distance chosen by feel.
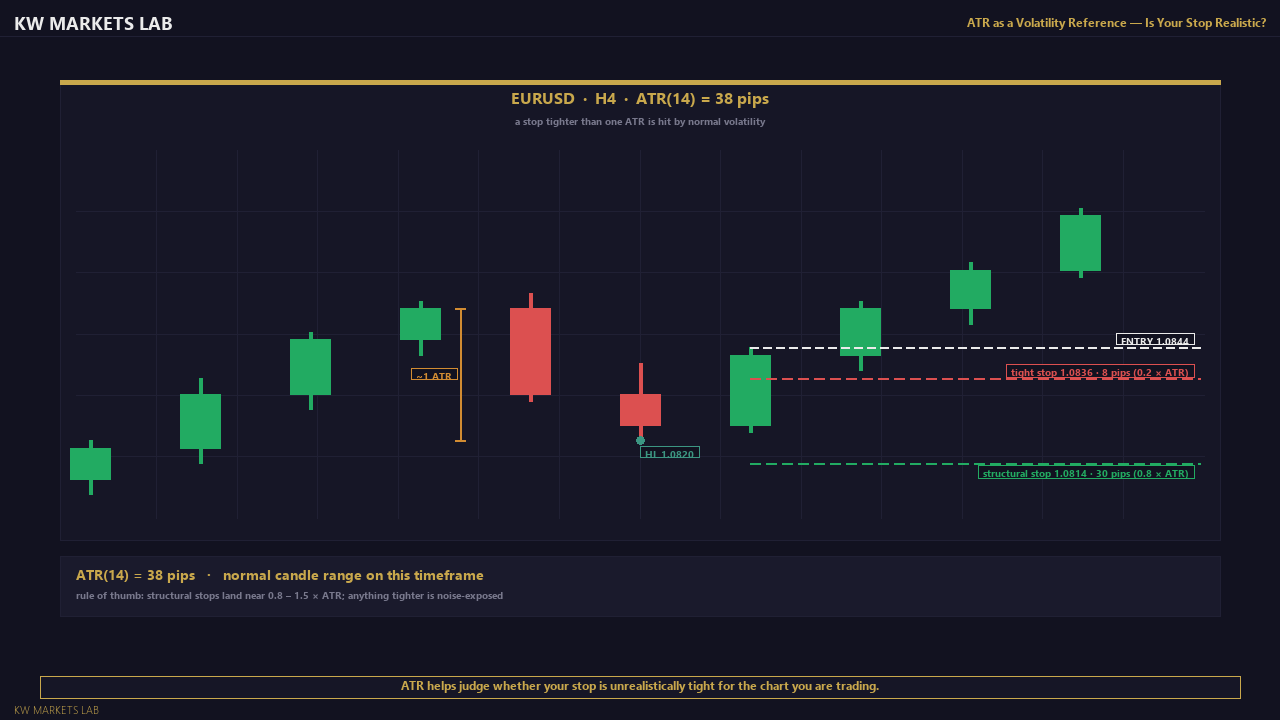
This does not override structure-based placement — it supplements it. The structural level defines where the stop goes. ATR tells you whether that distance is sensible for the instrument and timeframe. If the structural level requires a 5-pip stop on the daily chart where ATR is 80 pips, something is misaligned — either the timeframe is wrong or the entry point is too far from the structural level to be viable.
Common Mistakes
Choosing entry before choosing stop placement.
The correct sequence is: identify the structural entry zone → identify the structural invalidation level → calculate the distance → calculate position size → decide if the risk:reward is acceptable → enter. Many traders reverse this order — they find an entry they like and then hunt for a nearby stop to minimise the loss. This produces stops in arbitrary positions.
Not checking the risk:reward before entry.
Once you have placed your stop at the correct structural level, calculate the distance to your target. If the risk:reward is 1:0.8 (you are risking more than you stand to gain), reconsider the trade. A minimum 1:1.5 or 1:2 risk:reward is the standard threshold in most documented systematic approaches.
Using the same stop distance across different timeframes.
A swing low on the M15 chart is much closer to the entry than a swing low on the H4. Using H4-sized stops on M15 entries inflates your risk per trade. Using M15-sized stops on H4 entries almost guarantees the stop is hit by normal candle range before the trade plays out.
Failing to account for spread in the stop calculation.
Your stop loss triggers at the bid price for long positions and the ask price for short positions. The spread means your trade starts slightly offside. Factor the spread into your dollar risk calculation, particularly on instruments with wider spreads (gold, GBP crosses during volatile sessions).
Key Takeaways
- A stop loss is placed at the level where the trade thesis is structurally invalidated — not at an arbitrary pip distance.
- For longs: stop below the relevant swing low, with buffer. For shorts: stop above the relevant swing high, with buffer.
- Never place stops at round numbers without buffer, at exact swing points without buffer, or at arbitrary pip distances.
- Never move a stop wider after entry because the trade is going against you.
- Stop distance and position size are directly linked: wider stop = smaller position size, to keep dollar risk constant.
- Use ATR as a reference for minimum viable stop distance on a given instrument and timeframe.
Checkpoint Exercise
Look at a chart of EURUSD or XAUUSD on H4. Find a recent long setup (a pullback to support in an uptrend). For that setup:
- Identify the correct structural stop: which swing low does the stop go below? What level is that?
- Add appropriate buffer (5–15 pips for forex, $3–$8 for gold). What is your stop level?
- Set a target at the next structural resistance. Calculate the risk:reward ratio.
- If the risk:reward is below 1:1.5, what would you need to change to make this trade viable (if anything)?
Lesson Objective
By the end of this lesson, you should be able to place a structure-based stop loss on a long and short setup, explain why arbitrary pip-distance stops are flawed, describe the relationship between stop distance and position size, and state the three places a stop should never be placed.
Get notified when new lessons and content are published.