Intermediate Entry Models and Execution / Module 4: Execution Discipline Lesson 11 of 16
Course Outline — Lesson 11 of 16
M1 Entry Model Types
1 L1.1 — The Three Entry Model Archetypes 2 L1.2 — Limit Orders vs Stop Orders at Structure 3 L1.3 — The Rejection Candle: Your Confirmation Trigger 4 L1.4 — The BOS Entry: Trading the Continuation After the Break
M2 Confirmation Logic
1 L2.1 — What Confirmation Actually Means 2 L2.2 — The Pre-Entry Checklist 3 L2.3 — When a Valid Setup Should Still Be Skipped
M3 Session-Based Execution
1 L3.1 — The Three Sessions and Their Structural Behaviour 2 L3.2 — Using Session Highs and Lows as Execution Anchors 3 L3.3 — Time-of-Day Filters for Entry Quality
M4 Execution Discipline
1 L4.1 — Stop Placement Before Entry: The Non-Negotiable Rule 2 L4.2 — The No-Chase Rule 3 L4.3 — Managing the Trade After Entry
M5 Trigger Quality and the No-Chase Rule
1 L5.1 — Grading Your Setups: A Quality Framework 2 L5.2 — Common Execution Errors and How to Prevent Them 3 L5.3 — Building Your Personal Execution Protocol
Lesson 11 of 16

L4.1 — Stop Placement Before Entry: The Non-Negotiable Rule

The stop-loss must be placed before the entry order. Not after. Not "I will manage it manually." Before. This is not a suggestion — it is the mechanism that separates structured trading from gambling. Every trade must have a defined invalidation level before it is placed, and the stop must sit at or just beyond that level.

Structural stop placement: the stop sits below the structural level that the setup depends on. For a long at a support zone, the stop sits below the zone — at the point where a close below it means the zone has failed. For a BOS continuation, the stop sits below the flipped level. The stop is not placed based on pip count or account tolerance — it is placed based on structure.

Stop Placement Before Entry — Chart View
Stop Placement Before Entry — Chart ViewStop first. Size second. Entry last. Never reverse this order.

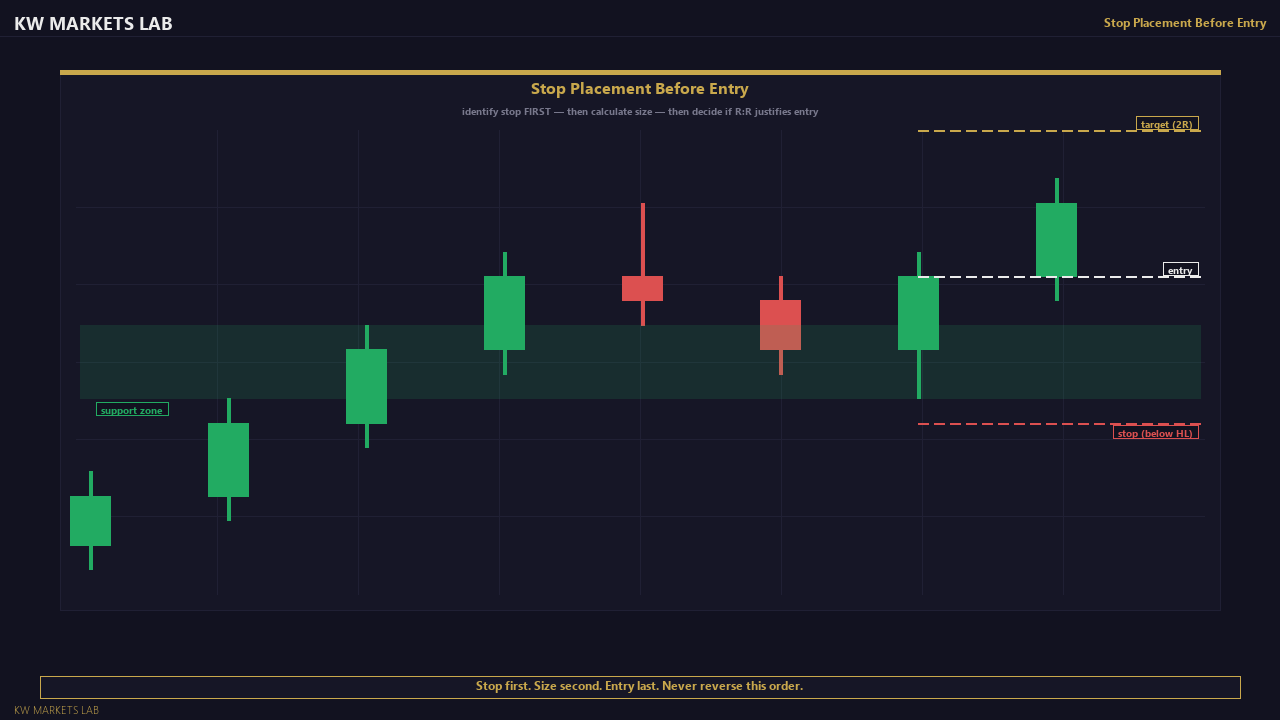
The consequence of correct stop placement is that your position size is derived from the stop distance and your risk percentage — not the other way around. If the structurally correct stop distance produces a position size that you are uncomfortable with, the answer is to trade smaller or skip the trade — not to move the stop closer to make the numbers work.

Continue Learning
L4.2 — The No-Chase Rule →
Stay Updated

Get notified when new lessons and content are published.