Advanced XAUUSD Gold Specialization / Module 5: Gold-Specific Case Studies Lesson 14 of 16
Course Outline — Lesson 14 of 16
M1 Gold Behaviour and Volatility Profile
1 L1.1 — Why Gold Behaves Differently from Forex Pairs 2 L1.2 — What Drives Gold Price: Macro Context for Technical Traders 3 L1.3 — Gold Volatility Profile: ATR, Wicks, and Typical Session Ranges 4 L1.4 — Spread, Commission, and the True Cost of Trading Gold
M2 Key Gold Setups
1 L2.1 — The Top-Down Gold Setup: Daily Bias to H1 Entry 2 L2.2 — Asian Range Breakout Setups on Gold 3 L2.3 — Gold BOS Continuation: Adapting the Framework to Gold's Profile
M3 Session Behaviour on XAUUSD
1 L3.1 — Asian Session: Consolidation, Range Identification, and Patience 2 L3.2 — London Session: Expansion, Direction, and Entry Windows 3 L3.3 — New York Session: Continuation vs Reversal Decision Points
M4 Risk Management for Gold
1 L4.1 — Position Sizing for Gold: Accounting for Pip Value 2 L4.2 — Managing Around Gold-Specific Risk Events 3 L4.3 — Gold-Specific Stop Placement: Buffering for Wicks
M5 Gold-Specific Case Studies
1 L5.1 — Case Study: Clean Bullish BOS on H4 Gold 2 L5.2 — Case Study: Asian Range Sweep and London Reversal 3 L5.3 — Case Study: Gold During a High-Impact News Event
Lesson 14 of 16

L5.1 — Case Study: Clean Bullish BOS on H4 Gold

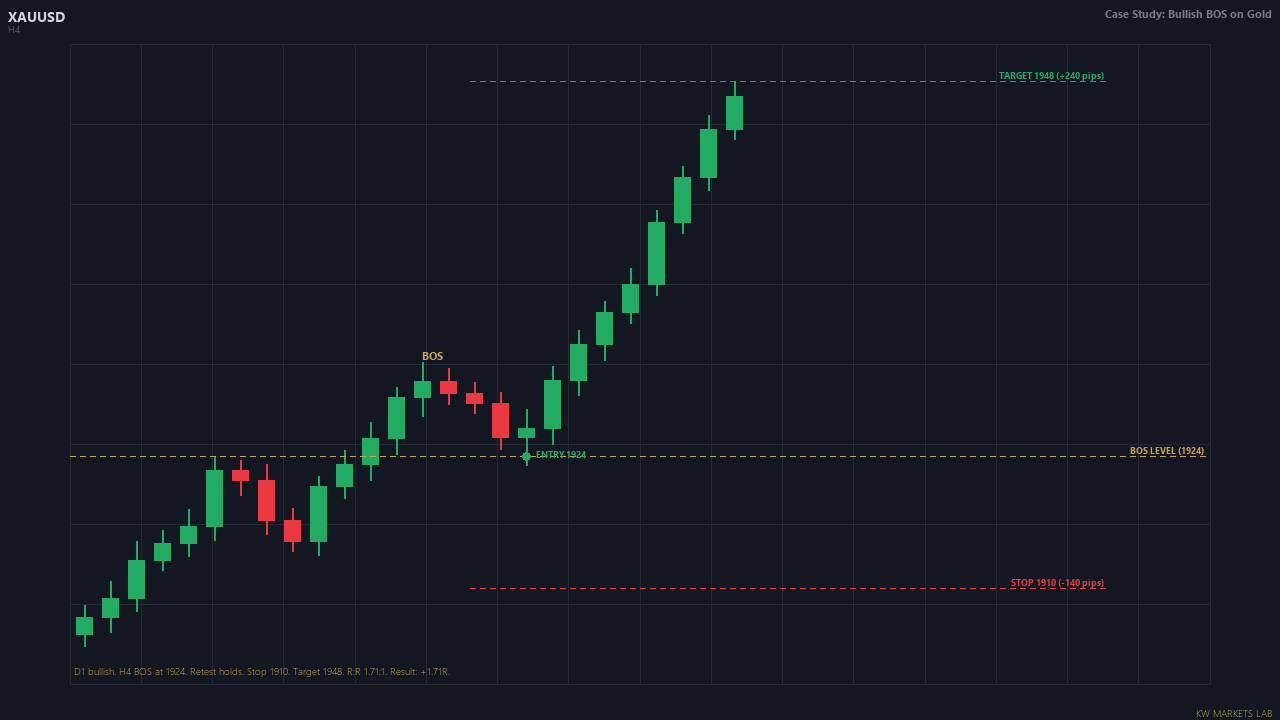
This case study walks through a high-quality bullish BOS setup on the H4 gold chart. Daily context: XAUUSD in a confirmed uptrend with a pullback in progress. DXY showing early signs of a downward reversal. H4: price has pulled back to a pre-marked demand zone at a previous structural support. H1: a BOS of the most recent internal swing high confirms that the pullback has ended and the bullish structure is resuming.

Entry on the H1 BOS candle close. Stop below the H4 demand zone with 25-pip buffer. Target at the daily structural high. Position size calculated from the stop distance at 1% risk. This is a three-timeframe aligned setup with macro support — an A-grade gold opportunity.

Six-step case study walkthrough from D1 bias to exit result.
Case Study: Bullish BOS on GoldD1 bullish. H4 BOS at 1924. Retest holds. Stop 1910 (-140 pips). Target 1948 (+240 pips). R:R 1.71:1.

The post-trade review: what happened after entry, how the trade was managed at the first H4 resistance level, and whether the full target was reached or whether a partial exit at 1R and trail was the better management choice given the structure between entry and target.

Continue Learning
L5.2 — Case Study: Asian Range Sweep and London Reversal →
Stay Updated

Get notified when new lessons and content are published.